|
| Thursday, November 23, 2006 |
| Installing CACTI Under Unix |
1. Extract the distribution tarball.
shell> tar xzvf cacti-version.tar.gz
2. Create the MySQL database:
shell> mysqladmin --user=root create cacti
3. Import the default cacti database:
shell> mysql cacti <> mysql --user=root mysql
mysql> GRANT ALL ON cacti.* TO cactiuser@localhost IDENTIFIED BY 'somepassword';
mysql> flush privileges;
5. Edit include/config.php and specify the MySQL user, password and
database for your Cacti configuration.
$database_default = "cacti";
$database_hostname = "localhost";
$database_username = "cactiuser";
$database_password = "cacti";
6. Set the appropriate permissions on cacti's directories for graph/log
generation. You should execute these commands from inside cacti's
directory to change the permissions.
shell> chown -R cactiuser rra/ log/
(Enter a valid username for cactiuser, this user will also be used in
the next step for data gathering.)
7. Add a line to your /etc/crontab file similar to:
*/5 * * * * cactiuser php /var/www/html/cacti/poller.php > /dev/null 2>&1
Replace cactiuser with the valid user specified in the previous step.
Replace /var/www/html/cacti/ with your full Cacti path.
8. Point your web browser to:
http://your-server/cacti/
Log in the with a username/password of admin. You will be required to
change this password immediately. Make sure to fill in all of the path
variables carefully and correctly on the following screen. |
posted by realme @ 5:27 PM  |
|
|
|
| Wednesday, November 22, 2006 |
| Langkah Instalasi FreeBSD 4 |
| -Panduan Singkat Tulisan ini merupakan sebuah prosedur ringkas cara menginstalasi FreeBSD. Tetapi disini ditambahkan fungsi portupgrade -ai (mengganti semua port, dengan konfirmasi), yang memerlukan beberapa konfigurasi lokal dalam file pkgtools.conf. Tujuan uraian ini adalah memakai cvsup.sh && build-world-kernel.sh, dan terbangunnnya sistem yang dapat memberitahu anda apa yang harus dikerjakan kemudian agar instalasi lengkap dengan sedikit usaha. Bagi pemula, sebaiknya pada waktu praktek mengikuti langkah langkah berikut didampingi rekan yang telah terbiasa dengan instalasi FreeBSD. Penjelasan tentang perintah dalam FreeBSD silahkan lihat FreeBSD Handbook. Setelah anda sukses melakukan instalasi FreeBSD, gantilah kernel anda, dan instalasi beberapa port-nya. Anda perlu perhatikan perintah instant-server dan instant-workstation meta-ports, yang menyatukan layanan yang diperlukan dan aplikasi dekstop. Terutama jika anda mengetik cd /usr/ports/misc/instant-workstation && make
sistem anda akan menginstalasi berbagai macam software yang bermanfaat secara otomatis. Dalam uraian ini tidak dijelaskan bagaimana mengubah script yang ada, anda mungkin harus memutuskan mengedit script dalam sistem anda nantinya dan disesuaikan dengan data teknis jaringan komputer anda. Pengeditan script bisa dilakukan dengan mengetik perintah vi namafilenya, setelah muncul filenya barulah anda edit atau isi dengan data teknis jaringan anda seperti nama host, IP address, netmask dll. Catatan: Perintah $myself dan $hostname, yang dipakai dibawah ini tidak ditujukan sebagai variabel shell sebenarnya. Ketika anda melihat mereka, langsung masukan saja data yang sesuai dengan jaringan komputer anda. Postfix akan memakai variable yang ada didalam file main.cf, ingat -- nama variabel dalam posfix (tidak ditulis italic) dan dapat diakses langsung, jadi Postfix dapat melakukan substitusi variabel secara sendiri. Catatan: File file yang dipakai dalam prosedur ini ditujukan untuk pemakaian umum, dan meliputi berbagai saran. Namun ini belum tentu sesuai atau optimal bagi kebutuhan sistem anda. Akan tetapi cara berikut ini dapat merupakan awal yang baik bagi instalasi sistem anda. Disarankan untuk mendownload file resource bari uraian ini dari http://www.reppep.com/~pepper/freebsd/install/reppep.tgz, kemudian lihat dan sesuaikan dengan kebutuhan anda lalu copikan ke direktori /root/reppep untuk melanjutkan prosedur berikut nya. - Instalasi semua file distribusinya ("Semua source sistem, binari dan sistem X Window").
- Instalasi koleksi port.
- Konfigurasi network.
- Tambahkan :
bash cvsup ispell kde mozilla-gtk portupgrade rsync samba screen sudo
- Catatan: Jika anda ingin setiap user mempunyai group personal-nya (seperti yang ada pada Linux & Panther), buatlah group group baru pertama kali pada saat melakukan sysinstall. pastikan setiap langkah pembuatan account user, tiap user mempunyai group 0 (
wheel) member-- sebab dengan cara su akan mengalami kurang cocok.
Setup Dasar dan Account - Serial console dibuat enable dengan mengetikan :
echo "-hD" > /boot.config tekan enter. - Bila anda tidak melakukan itu pada terminal serial didalam
sysinstall, lakukan sekarang dengan cara mengetikan : echo 'ttyd0 "/usr/libexec/getty std.9600" dialup on secure' >> /etc/ttys lalu tekan enter. Ketikan: visudo # uncomment full access for %wheel lalu tekan enter. Ketikan: cd /root && ftp http://www.reppep.com/~pepper/freebsd/install/reppep.tgz && tar xzf reppep.tgz && ls -lt reppep kemudian anda tekan tombol enter, ambilah file file tambahan yang disarankan berikut patch-nya, dan bukalah pada untuk direktori /root/reppep -- bila anda punya patch local, buka jugalah file file itu untuk patch lokal anda. - Jika anda punya pacth lokal, bukalah file file itu dengan cara mengetikan.
tar xzf local.tgz && ls -lt reppep tekan enter. Ketikan: patch /etc/ssh/sshd_config /root/reppep/sshd_config.diff tekan enter. - Instalasilah file kernel anda dan tetapkan konfigurasinya dalam direktori
/usr/src/sys/i386/conf. Ketikan: cd /etc && cp /root/reppep/make.conf . && cat /root/reppep/rc.conf* >> rc.conf && vi resolv.conf rc.conf make.conf && egrep -v '(^$|^#)' rc.conf | sort | more # tuliskan semua konfigurasi jaringan komputer anda pada file rc.conf.local; pastikan tidak ada variabel yang anda tuliskan dua kali didalam file rc.conf. Ketikan: mkdir -p /home/ports/distfiles && cd /usr/ports && rmdir distfiles && ln -s /home/ports/distfiles # preserves ports across rebuilds Ketikan: mkdir -p /usr/sup && cp /root/reppep/cvsupfile /root/reppep/periodic.conf /root/reppep/ntp.conf /etc && cp /root/reppep/refuse /usr/sup && vi /etc/cvsupfile /etc/ntp.conf /usr/sup/refuse Ketikan: mkdir -p ~root/bin ~root/log Ketikan: cd /root/reppep && cp build-world-kernel.sh cvsup.sh /root/bin && chmod u+x /root/bin/*.sh && rehash Ketikan: patch /usr/local/etc/pkgtools.conf /root/reppep/pkgtools.conf.diff
Catatan: Rekomendasi dari FreeBSD ada di http://www.freebsd.org/doc/en_US.ISO8859-1/books/handbook/makeworld.html, walau agak susah tetapi secara teori cukup aman. Jika anda masih kurang jelas dg apa yang anda lakukan disini ataupun dengan mengikuti langkah dari situs tadi, bacalah prosedur yang tertulis didalam Handbook FreeBSD. Peringatan: Langkah ini muda merusak sistem anda, atau mengunci anda sendiri, ketika melakukan perubahan kernel atau world. pastikan anda memiliki akses console (PS/2-style atau serial) sebelum melakukan perubahan. cvsup.sh # mengubah dasar FreeBSD yaitu source (kernel & world), dan pohon port; tidak akan berpengaruh terhadap port yang telah terinstall cd /usr/src && mergemaster -p # mergemaster akan membutuhkan banyak waktu, sehinga akan lebih b aik melakukannya sebelum sistem down. build-world-kernel.sh make installkernel shutdown -r now - Pembuatan kernel baru.
shutdown now # single-user cd /usr/src && make installworld mergemaster shutdown -r now - Editlah tiap file konfigurasi tambahan ang ada dalam direktori
/etc or /usr/local/etc. - Ujilah sambungan komputer anda ke jaringan dan firewal-nya (mungkin memakai perintah
ipfw list).
Catatan: Jika anda memakai bagian ini sebagai panduan dalam pengubahan sistem yang sedang beroperasi, dan bukan sistem yang baru anda buat, jangan lupa lakukan perintah portupgrade -ai pada saat kernel & world yang baru anda buat sudah selesai dikerjakan.. cd /etc/namedb && sh make-localhost && mv named.root named.root.old && dig @m.root-servers.net. ns . > named.root && vi named.conf && grep named /etc/rc.conf # konfigurasikan domain promer dan domain slave & instalasilah file file zona; bisa dilihat dengan menyetel opsi named_enable="YES" - Catatan: Konfigurasi BIND disini dioperasikan sebagai
root tanpa partisi pengamanan khusus. Situs http://www.freebsd.org/doc/en_US.ISO8859-1/books/handbook/network-dns.html memberikan instruksi untuk menjalankan BIND dalam sebuah kondisi chroot, dan BIND mungkin juga dioperasikan dalam kondisi jail. Kedua opsi tersebut cukup melindungi BIND dari serangan, dan bisa anda pertimbangkan, tetapi tidak akan dijelaskan dalam uraian ini.
cd /usr/ports/lang/perl5.8 && make install && rehash && use.perl port && perl --version portupgrade -a && portversion |grep -v = # mencoba mengubah apa saja. portinstall analog cronolog curl docproj-nojadetex htmldoc lsof lynx-ssl minicom netatalk nmap nut procmail webmin apache2 squirrelmail p5-Mail-SpamAssassin drac imap-uw postfix && rehash # customized or perl-based cd /usr/local/etc && cp smb.conf.default smb.conf && vi smb.conf # disini pasword enkripsi diset enable, lalu melakukan disable terhadap local master, dan disable printer; Disini juga dituliskan pembatasan akses dari IP seperti yang dituliskan dalam firewall yang ada dalam file smb.conf, sehingga semua program terkontrol melalui file yang sama. echo "- -noddp -passwdminlen 6 -loginmaxfail 6 -uamlist uams_dhx.so" >> /usr/local/etc/afpd.conf cd /usr/local/etc/rc.d && patch netatalk.sh /root/reppep/netatalk.sh.diff # disable atalk, pap, & nbp mkdir -p /var/log/samba && cd /usr/local/etc/rc.d && cp netatalk.sh.sample netatalk.sh && cp samba.sh.sample samba.sh - Konfigurasikan XFree86 (disini tidak akan dijelaskan lebih rinci) lihatlah situs http://www.freebsd.org/doc/en_US.ISO8859-1/books/handbook/x-config.html.
- Sekali XFree86 bekerja, pasti anda ingin menginstalasi KDE secara otomatis pada saat boot, coba lakukan perintah berikut :
echo 'ttyv9 "/usr/local/bin/kdm" xterm on secure' >> /etc/ttys, or use KDE with startx: echo exec startkde > ~/.xinitrc
cd /etc/mail && mv mailer.conf mailer.conf.sendmail && cp /root/reppep/mailer.conf . cd /usr/local/etc && cp /root/reppep/procmailrc . && vi procmailrc patch /etc/inetd.conf /root/reppep/inetd.conf.diff && patch /etc/pam.conf /root/reppep/pam.conf.diff # for imap-uw vi /usr/local/etc/mail/spamassassin/local.cf # customize SpamAssassin echo localhost > /usr/local/etc/dracd.host && /usr/local/etc/rc.d/dracd.sh start vi /etc/aliases && newaliases # forward for $myself & root - Jika memakai Postfix Virtual Host, editlah dengan cara ketikan:
vi /etc/mail/virtual && postmap /etc/mail/virtual cd /usr/local/etc/postfix && cat /root/reppep/main.cf.* >> main.cf && vi + /usr/local/etc/postfix/main.cf && postfix stop ; killall sendmail ; postfix check && postfix start && sleep 1 && tail /var/log/maillog cd /usr/ports/mail/imap-uw && make cert && chmod -x /usr/local/certs/imapd.pem # follow prompts - Bila diinginkan port terpasang lakukan:
portinstall -f mysql-server # -f to get around the hold in pkgtools.conf
mkdir -p /var/log/httpd /home/httpd && mv /usr/local/www/data /home/httpd/htdocs && mv /usr/local/www/cgi-bin /home/httpd && cd /usr/local/etc/apache2 && patch httpd.conf /root/reppep/httpd.conf.diff && touch vhost.conf - Either apply a local patch (
patch httpd.conf /root/reppep/httpd.conf.diff.local), or vi httpd.conf (set ServerAdmin & ServerName dan lihatlah securitynya) apachectl configtest && apachectl graceful mkdir -p ssl.crt ssl.key && cp /usr/local/certs/imapd.pem ssl.key/server.key && cp /usr/local/certs/imapd.pem ssl.crt/server.crt && vi ssl.???/* vhost.conf && apachectl stop && apachectl configtest && apachectl startssl && apachectl fullstatus # remove cert from server.key & key from server.crt cp /usr/local/etc/php.ini-recommended /usr/local/etc/php.ini cd /usr/local/www/squirrelmail && ./configure - Test https://$hostname/mail/.
- Menguji Squirell Mail (dg cara mengunencryp IMAP ke localhost) &
telnet $hostname imap akan gagal, jika diblok oleh firewall. - Tambahkan plugin tambahan yang anda inginkan untuk SquirrelMail .
cd /usr/local/lib/webmin/ && ./setup.sh - Visit https://$hostname:10000/
- Konfogurasi Webmin: IP Access Control: aturlah "Only allow from listed addresses" to 127.0.0.1 & trusted IPs.
- User Webmin: Buanglah semua modul yang tidak diperlukan.
- Bila mysql-server terinstalasi didalam server anda, Konfigurasi webmin dilakukan dibawah: Servers.
/usr/local/etc/rc.d/webmin.sh-dist stop # pakailah argumen start nanti, untuk mengoperasikan webmin bila diperlukan.
Setelah semua selesai, lakukan pengujian atas hasil kerja anda. Apabila ternyata ada kegagalan, ulangi langkah langkah diatas. Kegagalan adalah kesuksesan anda yang tertunda. Reff : http://www.reppep.com/~pepper/freebsd/install/ |
| posted by realme @ 8:28 AM |
|
|
|
| Thursday, November 16, 2006 |
| PREROUTING chain of the nat table |
The PREROUTING chain is pretty much what it says, it does network address translation on packets before they actually hit the routing decision that sends them onward to the INPUT or FORWARD chains in the filter table. The only reason that we talk about this chain in this script is that we once again feel obliged to point out that you should not do any filtering in it. The PREROUTING chain is only traversed by the first packet in a stream, which means that all subsequent packets will go totally unchecked in this chain. As it is with this script, we do not use the PREROUTING chain at all, however, this is the place we would be working in right now if we wanted to do DNAT on any specific packets, for example if you want to host your web server within your local network. For more information about the PREROUTING chain, read the Traversing of tables and chains chapter.
example : iptables -I PREROUTING -d 206.90.31.2/32 -j DNAT --to-destination 10.100.999.18 -t nat
 | The PREROUTING chain should not be used for any filtering since, among other things, this chain is only traversed by the first packet in a stream. The PREROUTING chain should be used for network address translation only, unless you really know what you are doing.
|
|
| posted by realme @ 5:21 PM |
|
|
|
| Monday, November 13, 2006 |
| Cache Replacement Policy |
Description
The cache replacement policy parameter decides which objects will remain in cache and which objects are evicted (replaced) to create space for the new objects. - LRU : Squid's original list based LRU policy
- heap GDSF : Greedy-Dual Size Frequency
- heap LFUDA : Least Frequently Used with Dynamic Aging
- heap LRU : LRU policy implemented using a heap
This applies to any cache_dir lines listed below this.
The LRU policies keep recently referenced objects. i.e., it replaces the object that has not been accessed for the longest time. The heap GDSF policy optimizes object-hit rate by keeping smaller popular objects in cache. So it has a better chance of getting a hit. It achieves a lower byte hit rate than LFUDA though, since it evicts larger (possibly popular) objects. The heap LFUDA ( Least Frequently Used with Dynamic Aging ) policy keeps popular objects in cache regardless of their size and thus optimizes byte hit rate at the expense of hit rate since one large, popular object will prevent many smaller, slightly less popular objects from being cached. Both policies utilize a dynamic aging mechanism that prevents cache pollution that can otherwise occur with frequency-based replacement policies. For more information about the GDSF and LFUDA cache replacement policies see http://www.hpl.hp.com/techreports/1999/HPL-1999-69.html and http://fog.hpl.external.hp.com/techreports/98/HPL-98-173.html . | Default | cache_replacement_policy lru | Example
cache_replacement_policy heap LFUDA
To use this policy, Squid should be built with configure option --enable-removal-policies=heap or simply --enable-removal-policies. Caution
If using the LFUDA replacement policy, the value of maximum_object_size should be increased above its default of 4096 KB to maximize the potential byte hit rate improvement of LFUDA. If needed to use other policies than default, squid should be built with configure option --enable-removal-policies. |
| posted by realme @ 9:58 PM |
|
|
|
| Friday, November 10, 2006 |
| Dummynet |

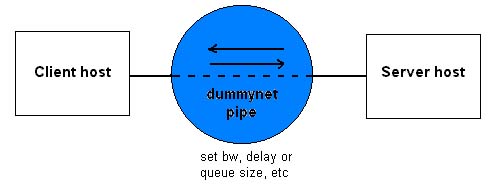
dummynet is a flexible tool for bandwidth management and for testing networking protocols. It is implemented in FreeBSD but is easily portable to other protocol stacks. There is also a one-floppy version of FreeBSD which includes dummynet and a lot of other goodies, see below. It works by intercepting packets in their way through the protocol stack, and passing them through one or more pipes which simulate the effects of bandwidth limitations, propagation delays, bounded-size queues, packet losses, etc. Each pipe can be configured separately, and packets are forwarded to the appropriate pipe using the ipfw packet filter. Thus you can apply different limitations/delays to different traffic according to the ipfw rules (e.g. selecting on protocols, addresses and ports ranges, interfaces, etc.).
How to use it
There are several ways to run dummynet: · in the machine where you are running your applications, by intercepting incoming or outgoing traffic; · you can run dummynet on a machine acting as a router between two or more networks, intercepting traffic going through the router; · finally, you can run dummynet on a machine acting as a bridge, without even the need to configure a router or changing addresses. You just need to split your cable and put a box in the middle! You have the option to run dummynet on a full FreeBSD install, or (for the last two cases at least) to use a one-floppy version of FreeBSD, called PicoBSD.
Use
Dummynet is heavily based on the ipfw package for packet selection. ipfw allows the selection of IP packets (and only them) based on a combination of source and destination addresses and ports, protocol types (e.g. UDP, TCP, ICMP, ...), interface, and direction (in or out). The packet filter can be programmed through a sequence of rules, which are applied in sequence to packets until a match is found. The rule specify the action to be taken, one of them being forward the packet to a dummynet pipe. Multiple rules can point to the same pipe. A pipe simulates the presence of a communication path, with bandwidth limitations, propagation delays, and bounded-size queues. You can define all these parameters independently for each pipe, e.g. ipfw pipe 1 config bw 256Kbit/s delay 300ms queue 10
ipfw pipe 2 config bw 128KByte/s
ipfw pipe 3 config bw 80Kbit/s delay 100ms
ipfw pipe 4 config plr 0.001 you define four pipes with different features (each pipe is identified by a unique, non-zero number). In particular the second one has no delay and unlimited buffers (virtually; in practice there is a configurable hard limit of 100 to avoid consuming all of your memory for packets queued on a pipe). The third one has no bandwidth and buffer limitations, but introduces a delay on packet forwarding. The fourth pipe simulates a lossy path with a packet loss rate (plr) of 0.1% This feature can be useful for testing purposes. You can omit parameters that are not needed, and issue a command multiple time to reconfigure the features of a pipe on the fly. The usual suffixes of K (1000 bits/s), KB (1000 Bytes/s), M (1000000 bit/s), MB (1000000 Bytes/s) can be used to specify the bandwidth, whereas the "ms" after the delay is just ignored. Queue size is in buffers. The routing of packets to pipes is done by specifying the action pipe NN to send the packet to a pipe. E.g.: ipfw add pipe 2 tcp from my_ip port 80 to any
ipfw add pipe 3 icmp from any to any
ipfw add pipe 1 ip from any to 224.0.0.0/4 out
ipfw add pipe 4 ip from any to any via lo0 the first rule limits outgoing Web traffic, the second one acts on ICMP requests making your machine appear very badly connected, the third one acts on all outgoing multicast traffic, and the fourth one passes loopback traffic through the lossy pipe defined above. You can of course intermix these with other ipfw rules (including SKIPTO actions). Once a packet has matched a rule with ``pipe'' action, it is forwarded to the appropriate pipe (where it can be just delayed, or even dropped if the queue is already full). On exit from the pipe, the packet is passed again to ip_input() or ip_output(), depending on its direction, and checked against ipfw rules starting from the next one after the matching rule. The presence of the SKIPTO rule makes it possible to construct arbitrary distribution graphs. Operation The ipfw code is used to select packets that must be subject to band width/queue/delay/losses, and returns the identifier of the ``pipe'' de scribing such limitations. Selected packets are first queued in a bounded size queue, from which they are extracted at the programmed rate and passed to a second queue where delay is simulated. At the output from the second queue packets are reinjected into the protocol stack at the same point they came from (i.e. ip_input(), ip_output(), bdg_forward() ). Depending on the setting of the sysctl variable sys.net.inet.ipfw.one_pass Packets coming from a pipe can be either forwarded to their destination, or passed again through the ipfw rules, starting from the one after the matching rule. dummynet performs its task once per timer tick. The granularity of opera tion is thus controlled by the kernel option options HZ whose default value (100) means a granularity of 10ms. For an accurate simulation of high data rates it might be necessary to reduce the timer granularity to 1ms or less. Consider, however, that some interfaces using programmed I/O may require a considerable time to output packets. So, re ducing the granularity too much might actually cause ticks to be missed thus reducing the accuracy of operation.
Kernel Options
The following options in the kernel configuration file are related to dummynet operation: IPFIREWALL - enable ipfirewall (required for dummynet). IPFIREWALL_VERBOSE - enable firewall output. IPFIREWALL_VERBOSE_LIMIT - limit firewall output. DUMMYNET - enable dummynet operation. NMBCLUSTER - set the amount of network packet buffers HZ - sets the timer granularity Generally, the following options are required: options IPFIREWALL options DUMMYNET additionally, one may want to increase the number of mbuf clusters (used to store network packets) according to the sum of the bandwidth-delay products and queue sizes of all configured pipes.
SYSCTL Variables
net.inet.ip.fw.one_pass is set to 1 if we want packets to pass through the firewall code only once. net.link.ether.bridge_ipfw is set if we want bridged packets to pass through the firewall code.
Commands
The following socket options are used to manage pipes: IP_DUMMYNET_CONFIGURE updates a pipe configuration (or creates a new one. IP_DUMMYNET_DEL deletes all pipes having the matching rule number. IP_DUMMYNET_GET returns the pipes matching the number. IP_FW_FLUSH flushes the pipes matching the number. When the kernel security level is greater than 2, only IP_DUMMYNET_GET is allowed.
History
dummynet was initially implemented as a testing tool for TCP congestion control by Luigi Rizzo, as described on ACM Computer Communication Review, Jan.97 issue. Later it has been then modified to work at the ip and bridging level, and integrated with the IPFW packet filter. |
| posted by realme @ 2:09 PM |
|
|
|
| Thursday, November 09, 2006 |
| How NAT Works |
When a client on the internal network contacts a machine on the Internet, it sends out IP packets destined for that machine. These packets contain all the addressing information necessary to get them to their destination. NAT is concerned with these pieces of information: - Source IP address (for example, 192.168.1.35)
- Source TCP or UDP port (for example, 2132)
When the packets pass through the NAT gateway they will be modified so that they appear to be coming from the NAT gateway itself. The NAT gateway will record the changes it makes in its state table so that it can a) reverse the changes on return packets and b) ensure that return packets are passed through the firewall and are not blocked. For example, the following changes might be made: - Source IP: replaced with the external address of the gateway (for example, 24.5.0.5)
- Source port: replaced with a randomly chosen, unused port on the gateway (for example, 53136)
Neither the internal machine nor the Internet host is aware of these translation steps. To the internal machine, the NAT system is simply an Internet gateway. To the Internet host, the packets appear to come directly from the NAT system; it is completely unaware that the internal workstation even exists. When the Internet host replies to the internal machine's packets, they will be addressed to the NAT gateway's external IP (24.5.0.5) at the translation port (53136). The NAT gateway will then search the state table to determine if the reply packets match an already established connection. A unique match will be found based on the IP/port combination which tells PF the packets belong to a connection initiated by the internal machine 192.168.1.35. PF will then make the opposite changes it made to the outgoing packets and forward the reply packets on to the internal machine. Translation of ICMP packets happens in a similar fashion but without the source port modification.
Source : Nat |
| posted by realme @ 1:41 AM |
|
|
|
| Friday, November 03, 2006 |
| QEMU on Debian |
| QEMU is the packages for linux. QEMU is a FAST! processor emulator using dynamic translation to achieve good emulation speed. Qemu is an alternative to VMWare. QEMU has two operating modes: Full system emulation. In this mode, QEMU emulates a full system (for example a PC), including a processor and various peripherials. It can be used to launch different Operating Systems without rebooting the PC or to debug system code. User mode emulation (Linux host only). In this mode, QEMU can launch Linux processes compiled for one CPU on another CPU. It can be used to launch the Wine Windows API emulator or to ease cross-compilation and cross-debugging.
On debian you can istall QEMU for installing Microsoft Windows. So Windows can run inside Debian.
For Further you can try to install QEMU to your Debian Machine, this is the step to install QEMU and also Installing Microsoft Windows. Enjoy It.
install QEMU
QEMU On Debian Wiki |
| posted by realme @ 8:23 AM |
|
|
|
| Thursday, November 02, 2006 |
| Earthrise |

"Earthrise", the first occasion in which humans saw the Earth seemingly rising above the surface of
the Moon, taken during the Apollo 8 mission on December 24, 1968. This view was seen by the crew at the beginning of its fourth orbit around the Moon, although the very first photograph taken was in black-and-white. Note that the Earth is in shadow here. A photo of a fully lit Earth would not be taken until the Apollo 17 mission.
Source : wiki |
| posted by realme @ 4:47 PM |
|
|
|
| Wednesday, November 01, 2006 |
| Open BSD 4.0 release |
OpenBSD is a secure, free computer operating system. It can run on many types of computers, including Intel PCs and Apple Computer's PowerPCs. Like the other open source BSDs and unlike with most Linux operating systems, the whole operating system is developed by the same group of people with OpenBSD. Programmes from other sources are available as binary packages or may be built from source using the ports tree. OpenBSD is often the first to add new security tools to make it harder to break, developers have also carefully read through the programming code to check for mistakes more than once. The project is led by Theo de Raadt from Calgary, Alberta, Canada and is released under conditions which put few rerestrictions on people that use the source code, the BSD licence. OpenBSD releases new versions every six months, each version is supported for one year after release. OpenBSD 3.9 was released May 1, 2006, and OpenBSD 4.0 is being developed for release in November 1, 2006. And Now OpenBSD has launching new release : OpenBSD 4.0, this is new fitur :
Had many more supported for hardware driver
1. X.Org 6.9.0 (+ added, dan i386 server XFree86 3.3.6 (+ added) for legacy chipsets not supported by X.Org)
2 Gcc 2.95.3 (+ added ) and 3.3.5 (+ added )
3 Perl 5.8.8 (+ added )
4 Apache 1.3.29, mod_ssl 2.8.16, DSO support (+ added)
5 OpenSSL 0.9.7j (+ added )
6 Groff 1.15
7 Sendmail 8.13.8, dengan libmilter
8 Bind 9.3.2-P1 (+ added )
9 Lynx 2.8.5rel.4 dengan HTTPS dan dukungan IPv6 (+ added )
10 Sudo 1.6.8p9
11 Ncurses 5.2
12 Latest KAME IPv6
13 Heimdal 0.7.2 (+ added )
14 Arla 0.35.7
15 Binutils 2.15 (+ added )
16 Gdb 6.3 (+ added )
Download this:
Download OpenBSD |
| posted by realme @ 3:23 PM |
|
|
|
|
| Gaim Beta 2.0 |
After success with gaim v 1.50, now gaim launch new gaim beta 2.0.
The 2.0 port of GAIM for windows is very different, a little better, and a little worse. The first thing you’ll notice is that the account statuses have been permanently integrated into the main window.
gaim is the one messenger can use multimessenger.
do u want try??
this link to dowload
|
| posted by realme @ 4:36 AM |
|
|
|
|
| Google Adsense |
AdSense is an ad serving program run by Google. Website owners can enroll in this program to enable text, image and, more recently, video advertisements on their sites. These ads are administered by Google and generate revenue on either a per-click or per-thousand-impressions basis. Google is also currently beta-testing a cost-per-action based service. Google utilizes its search technology to serve ads based on website content, the user's geographical location, and other factors. Those wanting to advertise with Google's targeted ad system may sign up through AdWords. AdSense has become a popular method of placing advertising on a website because the ads are less intrusive than most banners, and the content of the ads is often relevant to the website. It currently uses JavaScript code to incorporate the advertisements into a participating site. If it is included on a site which has not yet been crawled by the Mediabot, it will temporarily display advertisements for charitable causes known as public service announcements (PSAs). (Note that the Mediabot is a separate crawler from the Googlebot that maintains Google's search index.) Many sites use AdSense to monetize their content and some webmasters work hard to maximize their own AdSense income. They do this in three ways: - They use a wide range of traffic generating techniques including but not limited to online advertising.
- They build valuable content on their sites; content which attracts AdSense ads and which pay out the most when they get clicked.
- They use copy on their websites that encourage clicks on ads. Note that Google prohibits people from using phrases like "Click on my AdSense ads" to increase click rates. Phrases accepted are "Sponsored Links" and "Advertisements".
The source of all AdSense income is the AdWords program which in turn has a complex pricing model based on a Vickrey second price auction, in that it commands an advertiser to submit a sealed bid (not observable by competitors). Additionally, for any given click received, advertisers only pay one bid increment above the second-highest bid. ReadMore:
Term and Condition
language support |
| posted by realme @ 4:27 AM |
|
|
|
|
| Writing is Difficult things but Copy Paste is Easy one, so what do want to choose??
Up to You... |
| About Me |
|
![]()
Name: realme
Home:
About Me:
See my complete profile
|
| Previous Post |
|
| Archives |
|
|
| The Note |
Life like A Bird, free for flaying around the word. |
| Links |
|
| Powered by |

 |
|

